How to Enter and Delete Transactions by Batch in QuickBooks?
- devildevis233
- May 21, 2022
- 4 min read

Are you here to know about entering and deleting transactions by batch in QuickBooks Desktop? Well, keep reading the following article until the end to get its complete procedure.
As we all know, QuickBooks has emerged as one of the best accounting software available globally. Small and medium businesses have greatly benefitted a lot from this software. This software helps with accounting and payroll, but it also helps finance and sales. This software is counted as one of the best accounting applications of its advanced features and the addition of new features in every version.
The best thing which comes with the latest update of QuickBooks desktop is that it allows the batch entry of deposits, cheques, credit card charges or invoices, credit memos, and bills. In this article, we will discuss everything in-depth about how to enter or delete transactions by batch in QuickBooks Desktop. So, keep reading!
Points to Remember
You have to keep some points in mind before entering transactions by batch. Let's see all that points:
The very first thing is that first ensure that you have created a backup before moving towards steps.
If you are into export transactions from another company file, you have to copy multiple trades from one file to another.
You can merely make match entries of the checks, invoices, credit card charges, or bill credit if you have the QB desktop accountant or are using the latest version.
Features or Benefits of entering or deleting transactions by batch in QuickBooks Desktop
These are the feature and benefits you will get to enter or delete transactions by batch in your QuickBooks desktop:
1- Feature of batch enter transaction
In the beginning, you have to select the order in which you decided to display the data of columns or from the multiple columns field.
Done with this now, you need to enter the transactions into the personalized data entry.
Save all the transactions in one place.
2- Feature of batch delete transaction
For the transactions that have other linked transactions, you must show or hide them. And in other storing systems, it's generally hard to fetch out that an invoice has payment attached to it which makes this better than others.
We can also filter through the data range based on the last modified date or entered date.
The specific column is also the best option to ensure that you have made the correct decision about whether you want to delete it or not.
List of entering or deleting transactions by batch
Checks
Payees, including Customers, vendors, and employees
deposits
credit card charges
journal entries
invoices and credit memos
down payments
Steps to enter and delete transactions by batch in QuickBooks Desktop
These are the quick steps to enter and delete the transactions by batch in QuickBooks:
Step 1: Enter Transaction by collection in QuickBooks Desktop
QuickBooks Online Banking Services from the time you used in data entry by enabling you to add multiple transactions at a single point. We are writing the steps below, which you are suggested to follow:
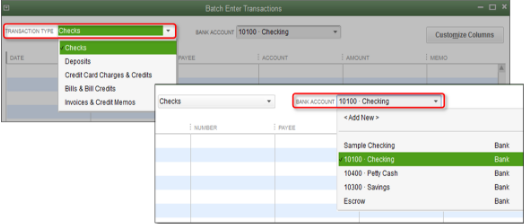
The QuickBooks users can easily access the "Batch Enter Transactions" from the banking option on the accountant menu bar.
Tap on the ""transaction type"" and later tap onto ""Transaction Type"" and ""Account "".
Next step is to follow to open the spreadsheet that carries the transaction you are required to record in QuickBooks Desktop.
After that classify the columns in the spreadsheet to verify the arrangement of columns in the batch transaction screen.
Press the "Ctrl + A" keys and right-tap on the screen and press the "Copy" option from the drop-down dialogue box appearing on the net.

The final step is to right-click the first date field and select "Paste" in the "Batch Enter Transaction" screen.
Step 2: Deleting transactions by batch in QuickBooks
Recently, only QuickBooks Premier Accountant, enterprise solutions 16.0, and QB Enterprise Accountant 2016. Are the latest versions takeover to delete transactions by batch. In this section, we will consider the workarounds that the users can use to accomplish the same task.
QuickBooks Premier Accountant, QB Enterprise Solution 18.0, and QB Enterprise Accountant 2018.
QuickBooks desktop pro or premier 2018, QuickBooks Enterprise Solution 18.0 and earlier:
Now Tap on “Ctrl + D” ((Edit > Preferences > General > My Preferences) keys to delete more easily.
You can also do this from the account register.
If you are attempting to replace all the transactions, you are suggested to go for a third-party application for unwanted transaction removal once.
Steps to file a batch invoice
You need to move towards the customers' tab and choose to create the batch invoice.
Ensure the terms, sales tax rate, and dispatch method are up to date for all customers you send batch invoices to by selecting each customer.
Double-tap the customer, open the additional info tab, and change the needed information.
Go to the customers you wish by searching or selecting the billing group.
Press on the next tab and choose the desired line item and template.
To enter a custom message, press the next tab.
See the list of invoices to be created and select create an invoice.
Print or email as appropriate and press on the close tab.
Final Words
We are now ending this article with the hope that it gives you better insights into the topic of entering or deleting the transactions by batch on QuickBooks desktop, and you should be clear about all its facts. Above, we have mentioned the points you should remember before entering or deleting. Side by side, we also have said the features or benefits of entering or deleting the transactions. At last, we have mentioned the steps through which you can solve if such an issue occurs on your desktop.
We hope that the above-given features and solution might be helpful for you. But if the above-shown steps don't work out best for you and do not solve the problem you face, feel free to contact our 24X7 QuickBooks desktop support team. They are experts and professionals, and they are all there to clear your doubts by giving their availability in 27/7 hours.


Comments